If you’ve ever tried to build an eLearning course without a storyboard, you probably found yourself halfway through the process asking, “What’s next?” or “Didn’t we do that already before?” Storyboarding in course design is where concept becomes form. It helps you plan out the entire course experience that is what the student sees, hears, and does, before you ever create a single screen. According to a 2023 eLearning Industry report, courses developed with a storyboard had a production cycle that was 30% shorter and required significantly fewer revisions during the review process. That is, a well-designed storyboard saves time and improves collaboration between designers, developers, subject matter experts, and stakeholders.
Why Storyboarding Is Essential
Storyboarding is more than just a basic creative blueprint; it’s an underlying framework that guides every step of the instructional design process. It simply allows for strategic alignment between pedagogical objectives and learner experience, guiding each item of content to meet a specific purpose and adhere to a coherent flow. Ideally, storyboarding assists teams in anticipating challenges, aligning early on expectations, and reducing guesswork during development.
An effectively designed storyboard supports:
- Alignment to learning objectives and instructional results
- Early detection of content holes or pacing problems
- Visual planning for multimedia and interactivity
- Effective workflows for development teams and QA testers
- Seamless handoffs and version control between departments
As noted in a 2023 eLearning Guild study:
- Development teams that used formal storyboarding reduced development time by 32%
- Content accuracy issues reduced by 38% after deployment
- Stakeholder satisfaction with final deliverables increased by 45%
Also, it has been noted in a study conducted by ATD that stakeholder engagement in the storyboarding stage decreases last-stage development change requests by nearly 50%. Much money is saved, and project delay is minimized, especially in enterprise environments where checkpoints exist to ensure legal and brand compliance.
Basically, a storyboard provides instructional designers, developers, voiceover artists, and QA teams with a single source of truth. Not only does it save rework, but it also facilitates scalability and long-term content governance.
Define Clear Learning Objectives
Definite learning objectives are the main part of all successful eLearning courses. They tell us what we want learners to know or be able to do following a lesson. Without objectives, material can end up getting un-focused or confusing, and learners tend to depart with knowing precisely what it was worth.
A well-written objective keeps everybody on the same page from subject matter experts to designers. It also guides what to cover, how to communicate it, and how to measure success. Good objectives:
- Address one concept or ability at a time
- Are concisely written
- Are measurable with a quiz, activity, or task
- Are anchored in real-world actions learners will perform
Instructional designers typically use Bloom’s Taxonomy when writing objectives. It provides a list of action verbs that correspond to different levels of thinking, from basic recall up through sophisticated problem-solving. For example:
- Identify
- Describe
- Compare
- Demonstrate
- Evaluate
- Create
Let’s take this one for example: Weak: “Understand GDPR.” (Too vague what is ‘understand’ even supposed to mean?)
Strong: “Identify three levels of GDPR data classification and apply correct handling procedures in a simulation.”
Know Your Audience
The most important thing to do prior to writing anything is to know who you’re designing for. If you overlook this, your course might be smooth but completely miss the mark when it comes to relevance and interest.
You must begin with a complete learner analysis. That means knowing not only the industry or job role, but also the day-to-day context in which learners will take the course. Ask yourself: What do they already know? What device are they on? Are there specific challenges they face? What are their motivations to take training or avoid it?
You have to always have these factors in your mind:
- Demographics: Age, education level, and occupation dictate how students consume information and what tone or examples will resonate.
- Prior Knowledge: Knowing what students already know avoids overexplaining or skipping the fundamentals.
- Learning Environment: Are they on mobile? Do they have brief windows to work with content? This affects design, pacing, and interactivity.
- Levels of motivation: Some students are motivated by compliance, others by career interest or career motivation. Motivation determines the style in which you organize your content and interact.
Choose the Right Format
Choosing the right format for your storyboard is determined by various practical factors, including the course’s sophistication, the number of people engaged in its development, and the equipment your team uses regularly. The format must balance creativity and clarity and make it easy for stakeholders to understand and provide feedback.
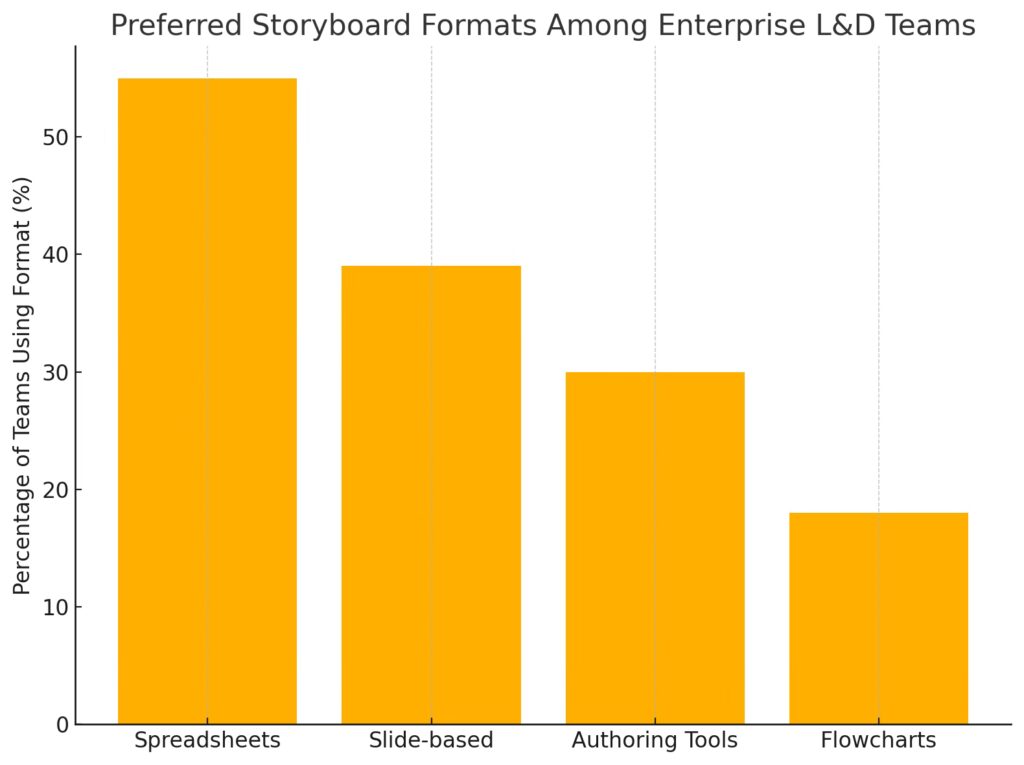
- Slide-based storyboards (e.g., PowerPoint, Google Slides): These are ideal when you must show a visual breakdown of each screen. They’re simple to review for non-technical stakeholders, and they allow you to mock up layouts, narration, and basic interactions.
- Spreadsheet storyboards (such as Excel, Google Sheets): Best for large, content-heavy courses or if you’re using multiple screens and branching situations. Spreadsheets help track content, narration, media, and interaction items in one tidy place.
- Integrated authoring tool storyboards (like Articulate Storyline, Adobe Captivate): These allow you to design your storyboard inside the tool that will be used for course building. They are perfect for rapid prototyping and previewing first interactions, but may be more challenging for stakeholders who are new to the platform.
- Visual flowcharts or mind maps (e.g., Lucidchart, Miro): These are suitable for representing non-linear learning paths or scenario-based content. They help designers and SMEs understand complex branching and user journeys before content is fully written.
Training Industry’s 2024 survey indicates that 55% of enterprise teams use spreadsheets for courses with 100+ screens, and 39% use slide-based formats.
Develop a Course Outline
Before getting into individual screens, it’s a good practice to look at the course as a whole. Start by drawing a high-level diagram that breaks down the training into sensible chunks or modules. This activity provides you with an awareness of the overall flow of the course and makes sure that each section ties in with your overall learning goals.
Each module must address one main topic and be linked to one to three particular learning goals. For example, if you’re designing a course on data privacy, you can begin with a review of basic privacy concepts. The second module can lead the students through the identification of sensitive information. After that, you can write about keeping and exchanging data safely and then discuss compliance and reporting. You will end by ending with a knowledge check or final test.
As you plan, predecide where to insert main features such as knowledge checks, interactive scenarios, or brief videos. This initial planning avoids an imbalance in content delivery and interactivity.
Having a good outline gives you a map before writing out each screen. It keeps the course focused, avoids incoherent sequencing, and helps to make time and resource estimates for production.
Build Each Screen With Purpose
Once your course map is done, it’s time to dive into the details: one screen at a time. Each screen in your eLearning course must cover one clear instructional point. This keeps the learning focused and avoids cognitive overload for your learners.
A solid entry in a storyboard specifies all the main items that will be on a screen. At the very least, it should have a screen number and title, a well-established learning objective it meets, and the main content, which will be visible, e.g., text or narration.
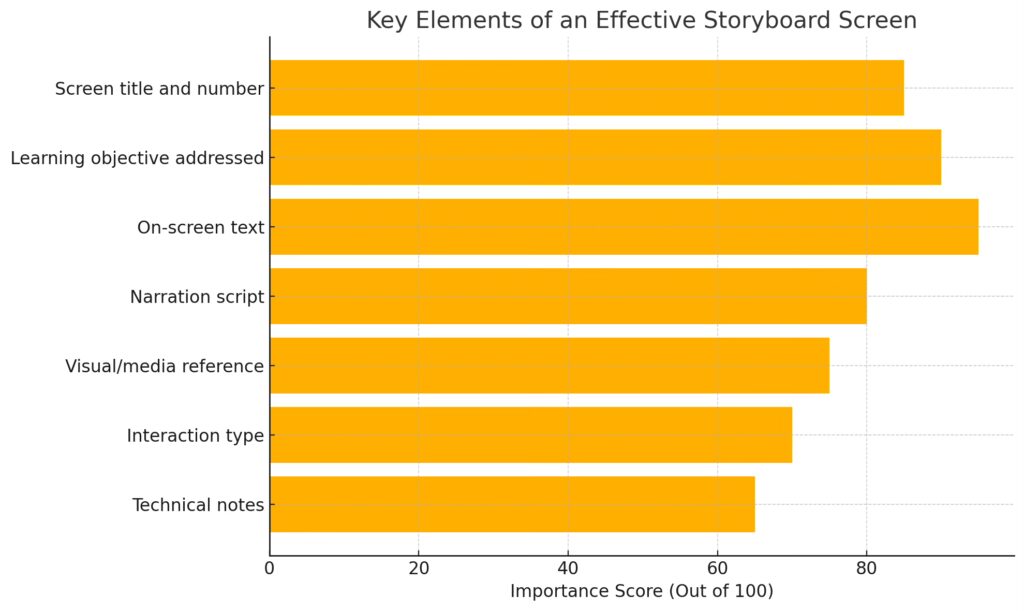
In addition to the content, also describe what kind of visuals or media will be displayed: photo, infographic, animation, or something else, and how the visuals relate to the content. The storyboard also needs to note any interactivity the screen will contain. Will students click to view tips? Drag and drop items into bins? Answer a quiz question? All this should be noted.
Moreover, technical details of the developer and QA testing should be supplied. These could encompass screen time, transitions, accessibility data (such as alt text or keyboard access), and design-specific instructions of any sort. Let’s be honest, a clear and consistent format in this way makes it simple for all team members to understand what is expected of them.
Integrate Interactive Elements
Making your course interactive is not a nice-to-have feature, but a must-have for maintaining students’ attention and motivation to apply what they’ve learned. Passive content like big walls of text or videos with no interaction leads to low retention rates. Interactive experiences, however, prompt learners to think, respond, and make decisions, which engages both attention and memory.
Actually, there are many ways to add meaningful interaction to a course. Scenario-based activities work well, allowing learners to practice decision-making in a safe environment. For example, a branching scenario might present a workplace problem with multiple options and outcomes, showing the impact of each choice. Click-to-reveal areas are ideal for keeping the screen uncluttered while urging learners to find out principles in gradual steps. Matching and classification activities enable clustering and retrieval of concepts. And short quizzes or checks of knowledge at module completion ensure reinforcement and prepare learners for final exams.
But don’t forget that it’s important to ensure that every interaction has a purpose. Everyone should be tied to a specific learning objective and include feedback, corrective, explanatory, or positive. Feedback tells learners why an answer was right or wrong and strengthens the connection between what they did and what they need to remember.
Good interactivity is not merely about adding buttons or animations for their own sake. It’s about giving students a reason to stay interested and helping them apply what they’ve learned in a real way.
Mayer’s principles of multimedia learning advocate for:
- Combining visuals with narration (dual-channel theory)
- Avoiding redundancy (reading text verbatim from the screen)
- Using animation to show dynamic processes
Thus, to keep it short and quick for you, each storyboard entry should specify:
- Type of media (image, video, animation)
- Voiceover script
- Media placement and size
- Accessibility support (transcripts, alt text)
Address Accessibility Early
Accessibility design from the start allows you to build accessible learning experiences and meet necessary standards like WCAG 2.1 and Section 508.
What this means is thinking about accessibility as you plan out each screen in your storyboard. Be sure to include notes that specify what visual elements need alt text, what interactions must work using a keyboard, and where captions and transcripts will be required.
For example, every image should include alternative text descriptions to allow screen readers to read them out for visually impaired students. Your color choice should offer enough contrast to read. Navigation should be done without a mouse, and audio or video material should be provided with captions or written transcripts.
Prepare for Localization and Tracking
If your course will be used in multiple regions or languages, take into account that your storyboards must account for:
- Space for longer translated text (e.g., German is 30–40% longer than English)
- Culturally neutral visuals
- Avoidance of idioms and slang
- Placeholders for voiceover in other languages
Thus, to understand if everything goes well, you have to plan how to track learner performance. You can include SCORM, xAPI, or LMS tracking notes in the storyboard, like:
- Trackable interactions and scores
- Time spent per screen
- Completion status triggers
- Decision points for branching analysis
Incorporate Quality Assurance Early
When you’re done with the initial stages, you need to concentrate on quality assurance. Your QA should be built into the storyboard process, not left for final testing. Generally, it includes clear learning objectives for each screen, flags for high-risk interaction types, notes for media testing and compatibility checks, as well as accessibility compliance indicators.
This detects issues early and reduces rework later in the development process. It keeps the direction on course with instructional purpose and technical requirements as it moves forward from design to construction.
Use Version Control and Handoff Best Practices
Efficient versioning practices help prevent confusion during review and development. So, simply:
- Use file naming conventions (e.g., Storyboard_V1.2_Date)
- Maintain change logs
- Lock approved versions for development
- Share handoff packages with final storyboard, scripts, media specs, and style guides
Review and Iterate
Once your storyboard is written, don’t rush on to development. Rather, set up several review cycles to ensure that all works as it should. The reviews ensure issues are picked up early and improve the overall quality of the completed course.
Start by having your storyboard reviewed by instructional designers who can check the instructional flow and consistency. Then, have subject matter experts (SMEs) review to check that the content is accurate. Developers should also be included in the review to mark technical or tool-based limitations. Lastly, have your storyboard forwarded to branding or legal teams if needed to check that everything is in line with your organization’s standards.
Be ready to make changes. A typical storyboard goes through 2–3 formal review rounds before it’s finalized. Including these milestones on your timeline at the outset will keep you on schedule and avoid last-minute changes down the road.
Plan for Scalability and Maintenance
And finally, most eLearning courses will eventually need maintenance earlier or later, either because of changing content, software updates, or new compliance requirements. That’s why provision needs to be made for maintenance and scalability right from the storyboard stage.
To facilitate easier updates, structure your course in modules. This allows each component to be updated without the need to refurnish the entire course. Store narration scripts and visual elements separately so that they can be easily replaced when necessary. Create a master content library that contains reusable text fragments, templates, and visuals. This is time-saving on subsequent projects and achieves consistency in your courses. It is also a good idea to document why specific design choices were made. That way, if a future team returns to the course, they will see the reasoning and can make smart modifications.
Example Screen Entry
| Screen | Title | Objective | Visual | Interaction | Notes |
|---|---|---|---|---|---|
| 2.1 | Email Phishing | Identify phishing indicators | Mock email with suspicious links | Click-to-reveal red flags | Add screen reader support |
So…
Storyboarding is a foundational discipline in professional instructional design. It bridges creativity and structure, ensuring alignment across teams and clarity for learners. Teams that invest in a thoughtful storyboarding process benefit from:
- Faster production cycles
- Lower error rates
- Better learner engagement
- Measurable performance improvement
- Easier updates and scalability
- Improved stakeholder satisfaction
Whether you use slides, spreadsheets, or interactive tools, the storyboard remains your most strategic asset for producing high-impact, scalable eLearning experiences. A detailed, data-informed storyboard transforms the design process, the learner’s experience, and the business outcome of every training program.
Want to launch your course online and get the most out of it? Contact us now!