Launching a course on a specific timeline is simple with FoxLMS. In this guide, we’ll show you How to Schedule a Course from start to finish.
Create the course first #
Before scheduling, make sure your course is ready:
- Add lessons, quizzes, and any downloadable resources.
- Set pricing/access and other core settings.
- (Optional) Preview your course to ensure the structure and content look correct.
If you need help building the course itself, follow this detailed guide: Create a Course.
How to Schedule a Course in FoxLMS (step-by-step) #
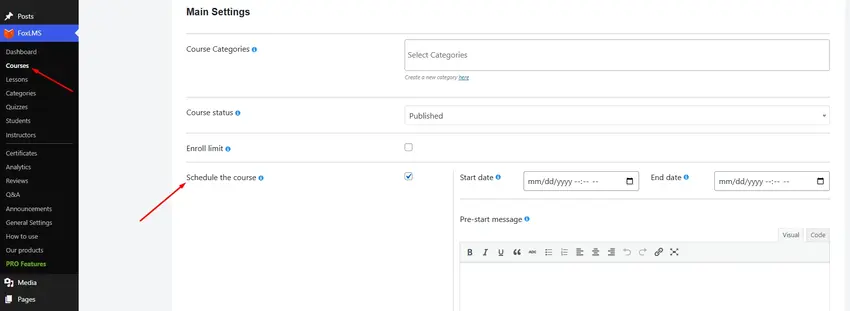
- In your WordPress dashboard, go to FoxLMS → Courses and either Add New or edit an existing course.
- In the course settings area (main settings panel for that course), locate “Schedule the course.” Toggle it On to reveal the scheduling fields.
- After setting your dates and messages (explained below), click Publish or Update to apply the schedule.
How to Schedule a Course: Settings Explained #
Once Schedule the course is enabled, you’ll see four main controls. Here’s how each works and when to use it.
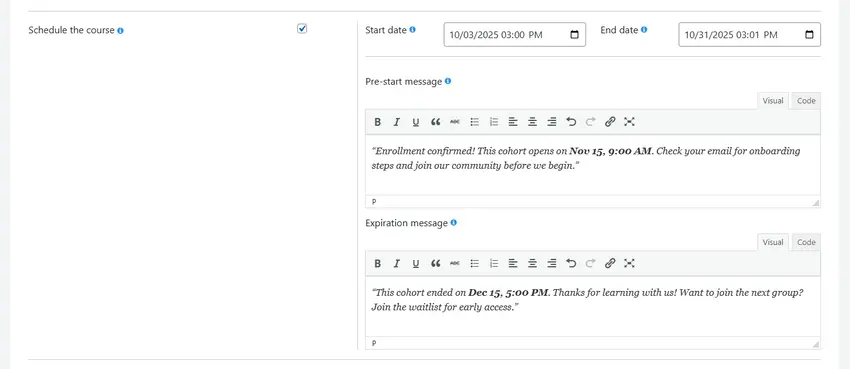
1) Start date (required when scheduling) #
- What it does: Defines when learners can first access the course.
- Behavior:
- Before this date/time, the course content is locked.
- Visitors will see your Pre-start message (if you add one).
2) End date (optional but recommended) #
- What it does: Sets when the course access ends.
- Behavior:
- After this date/time, learners can no longer access the course.
- Visitors/learners will see your Expiration message instead of the course content.
- Tips:
- Use an end date for fixed-length cohorts or seasonal programs.
- If your course is evergreen, you can leave this blank.
3) Pre-start message (rich text editor) #
- What it does: Displays a custom message before the Start date.
- Use cases:
- Inform learners when the course opens (include date/time).
- Provide onboarding steps: join your community, complete a pre-survey, or read a welcome guide.
- Example copy:
“Enrollment confirmed! This cohort opens on Nov 15, 9:00 AM. Check your email for onboarding steps and join our community before we begin.”
4) Expiration message (rich text editor) #
- What it does: Displays a custom message after the End date.
- Use cases:
- Explain that the cohort has finished and provide next steps (e.g., waitlist or next start date).
- Offer alumni resources or a voucher for the next session.
- Example copy:
“This cohort ended on Dec 15, 5:00 PM. Thanks for learning with us! Want to join the next group? Join the waitlist for early access.”
That’s how to schedule a course in FoxLMS. By following these steps, you can easily set up courses for fixed dates, seasonal programs, or special bootcamps. If you plan to run more than one course this year, keep this guide as a handy checklist for How to Schedule a Course and use the same steps each time.
If you have any questions or need help, feel free to reach out to our support team anytime.


